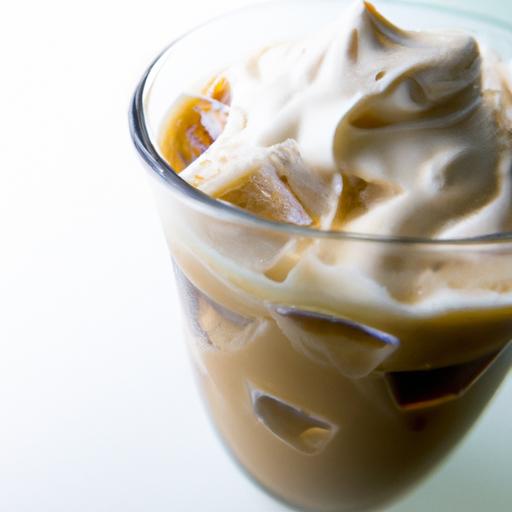
There’s something undeniably magical about that first sip of a Starbucks cold brew crowned with luscious, velvety cold foam-a simple touch that transforms an ordinary coffee into a creamy, cloud-like indulgence. But why wait in line or pay premium prices when you can bring this café favorite right into your own kitchen? In this article, we’ll dive into an easy-to-follow DIY Starbucks cold foam recipe that captures all the frothy goodness without the fuss. Whether you’re a coffee connoisseur or just looking to elevate your morning routine,get ready to whip up your own silky,dreamy foam and sip like you’re in your favorite coffee shop-no barista skills required.
DIY Starbucks Cold Foam has taken the coffee-loving community by storm, transforming everyday lattes and iced brews into velvety, cloud-like indulgences. The magic lies in its silky texture and light, airy froth that sits gracefully atop your drink, elevating each sip with a luxurious mouthfeel. Originating from Starbucks’ innovative barista crafting, this cold foam is surprisingly simple to recreate at home – offering you barista-quality charm without the wait.
Choosing the perfect Milk for Creamy, Frothy Texture
the secret to that irresistibly smooth and frothy cold foam starts with choosing the right milk. While starbucks often uses nonfat milk to create a light, airy foam, your choice can drastically influence the final texture and flavor. Whole milk will yield a richer, creamier foam, while skim or fat-free milk produces a lighter, more ethereal froth. For vegan options, oat or almond milk, especially barista blends designed for frothing, also work beautifully, creating a delicate, stable foam that complements your coffee’s profile.
Step-by-Step Guide to Crafting Your Own Cold Foam at Home
Mastering your own cold foam is easier than you think, and with just a few tools, you’ll be impressing friends or simply enjoying café-style luxury in solitude.Follow thes clear and concise steps for perfect foam every time:
Prep and Cook Time: 5 minutes
Yield: Approximately ½ cup of cold foam (enough for 2 drinks)
difficulty Level: Easy
Ingredients
- ½ cup nonfat milk (or your preferred milk for frothing)
- 1 teaspoon vanilla syrup (adjust to taste; optional)
- 1 tablespoon light cream (for added richness; optional)
- Sweetener of choice (e.g., honey, agave, or simple syrup; optional)
- Pinch of salt (to balance sweetness and amplify creaminess)
Instructions
- Chill your milk. For best results,use cold milk straight from the fridge. Cold milk froths better and holds bloom longer.
- Combine ingredients. Pour the milk,vanilla syrup,light cream,and sweetener (if using) into a clean jar or frother.
- Froth vigorously. Using a handheld milk frother, electric frother, or a French press, froth the mixture for about 30-45 seconds untill silky foam forms. The foam should double in volume and look glossy.
- Let it settle. Allow the foam to sit for a few seconds to thicken slightly before spooning it gently over your iced coffee or cold brew.
- Serve immediately. The cold foam tastes freshest when made just before serving, creating that iconic contrast between smooth foam and chilled coffee.
Tips and tricks for Customizing Flavors and Sweetness Levels
One of the joys of crafting your own cold foam is the freedom to tailor it exactly to your taste buds. Here are some creative ways to put your stamp on the classic cold foam:
- Flavor Infusions: Add a drop of almond extract, a sprinkle of cinnamon, or matcha powder to the milk before frothing for a unique twist.
- Adjust Sweetness: Use flavored syrups like caramel, hazelnut, or toasted vanilla to elevate sweetness naturally.
- Milk Alternatives: Try barista blends of oat or soy milk, known for their froth-friendly proteins and smooth texture.
- Textural Variation: For a dreamier foam, increase light cream by 1 tablespoon; for a lighter feel, stick to all nonfat milk.
- Make Ahead: Cold foam is best fresh but can be briefly refrigerated (up to an hour). Re-froth gently before use to refresh the texture.
Chef’s Notes
Temperature Matters: Use cold dairy to improve foam stability and texture. Warm milk will yield a less stable foam.
Sweeten Smartly: Sweeteners mix better when the milk and flavorings are combined before frothing.
Tool Alternatives: No frother? A tightly sealed jar shaken vigorously for 30 seconds can produce decent foam.
Troubleshooting: If foam is watery, try milk with higher protein content or add a little less cream to avoid heaviness.
Storage tip: Avoid storing leftover foam overnight; it will separate and loose its luxurious texture.
Serving Suggestions
Elevate your cold foam experience with these serving ideas:
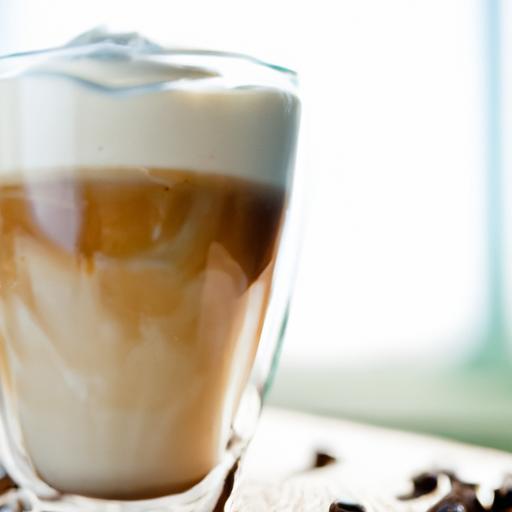
- Generously spoon cold foam over iced coffee or nitro cold brew for that crowd-pleasing layered look.
- Finish with a light dusting of cocoa powder, ground cinnamon, or nutmeg for visual flair and extra aroma.
- For a festive touch, add edible flower petals or a drizzle of caramel or chocolate syrup atop the foam.
- Serve with a reusable straw and clear glass to showcase the beautiful contrast between dark coffee and pale foam.
| Ingredient | Amount per Serving | Calories | Protein (g) | Carbs (g) | Fat (g) |
|---|---|---|---|---|---|
| Nonfat Milk | ½ cup | 43 | 4.3 | 5 | 0.1 |
| Light Cream | 1 tbsp | 40 | 0.1 | 0.3 | 3.5 |
| Vanilla Syrup | 1 tsp | 20 | 0 | 5 | 0 |
For more on coffee craft and homemade beverage magic,check out our iced Coffee Recipes. For the science behind milk proteins and frothing,visit Science Daily to dive deeper into the frothy wonders at molecular level.

Q&A
Q&A: DIY Starbucks Cold Foam – Easy Copycat recipe to Try Today
Q1: What exactly is Starbucks cold foam, and why is it so popular?
A: Starbucks cold foam is a light, frothy topping made from milk, whipped to a velvety, airy texture without heat. It adds a creamy, dreamy layer atop iced coffee or cold brews, elevating your drink with a smooth contrast that’s both visually appealing and tasty.Its popularity lies in the way it transforms a simple iced coffee into a café-worthy experience at home.
Q2: Can I make cold foam at home without fancy barista tools?
A: Absolutely! While professional baristas use specialized steam wands, you don’t need those gadgets to create cold foam. A simple handheld milk frother, a French press, or even a vigorously shaken jar can whip milk into fluffy foam in minutes. the key is cold, fresh milk and some elbow grease-or a trusty kitchen tool!
Q3: What type of milk works best for DIY cold foam?
A: Whole milk gives you the creamiest, most stable foam with rich flavor, mirroring Starbucks’ signature texture. However, if you prefer non-dairy options, try oat milk or almond milk that’s specifically designed for frothing-those tend to foam better than manny other plant-based milks. Skim milk can also foam well but produces a lighter,less creamy texture.
Q4: Do I need any special ingredients to replicate Starbucks cold foam?
A: The beauty of this copycat recipe is its simplicity! Usually, just milk and a touch of sweetener like vanilla syrup or a pinch of sugar. Some DIYers add a dash of vanilla extract or a tiny pinch of salt to enhance flavor. You can customize it to suit your taste preferences with spices like cinnamon or nutmeg, too.
Q5: How do I make the cold foam stay frothy longer?
A: fresh,cold milk and proper frothing technique are your best friends. Using cold milk straight from the fridge helps maintain foam structure. Creating smaller bubbles by frothing at a faster speed also makes foam creamier and longer-lasting. If you plan to enjoy your drink slowly, froth just before serving for the best texture.
Q6: Can I flavor my cold foam to match my favorite Starbucks drinks?
A: Yes! That’s where creativity shines. Add vanilla syrup for a classic vanilla cold foam, or try caramel drizzle for a sweet twist. For a seasonal vibe, infuse your foam with pumpkin spice or peppermint extract. These little additions mimic Starbucks’ flavored cold foams and let you personalize each cup.
Q7: Is cold foam healthier than whipped cream or other toppings?
A: Generally, cold foam uses less fat and fewer calories than whipped cream because it’s primarily milk aerated with air, not heavy cream. it offers a lighter,less sweet alternative that still adds richness without overwhelming your drink. It’s a delightful way to enjoy creamy texture with a bit more mindfulness.
Q8: How long can I store homemade cold foam?
A: Cold foam is best enjoyed immediately after frothing for maximum fluffiness. Storing it in the fridge may cause it to separate or lose its airy texture within 15-30 minutes. For sipping on the go, it’s best to make fresh each time or keep your milk chilled and froth just before serving.
Q9: Any tips for achieving that signature Starbucks cold foam look?
A: To get that iconic layered effect, pour your iced coffee into a glass first, then gently spoon or pour the cold foam on top.Using a clear glass shows off the creamy white foam contrasting with the dark brew beneath. For extra flair, sprinkle a bit of cocoa powder, cinnamon, or even espresso dust on top.
Q10: Can I use cold foam on drinks other than coffee?
A: Definitely! Cold foam pairs wonderfully with iced teas, refreshers, and even smoothies to add a velvety touch. It adds texture and richness without overpowering, making it a versatile topping for many chilled beverages.
Ready to whip up your own frothy Starbucks-style cold foam? With just a bit of milk and a little know-how, you can turn your kitchen into your favorite café-one velvety sip at a time!
To Conclude
Whipping up your own Starbucks-style cold foam at home doesn’t just save a trip to the café-it turns your kitchen into a playground of creamy, frothy possibilities. With this easy copycat recipe in your arsenal, every cup of iced coffee can feel a little more special, a little more luxurious, without the extra cost or wait time. So next time you’re craving that velvety top layer, remember: your perfect cold foam is just a whisk away. Happy brewing, and here’s to mornings made better-one frothy sip at a time!